Tuesday, December 13, 2011

DMK01 Bumblebee

Update!

Heh...a Transformer. Yep. It's been awhile eh? Well, actually this guys is a model kit actually. The term 'DMK' stands for 'Dual Model Kit'. Why? Beats me. Anyhoo, this kit is actually amazing with all the fantastic details and what not. Articulation is okay in my book. But a word of advice, this is definitely a model kit. It is not a toy. Some of the joints are a bit loose and quite fragile, and the kit being in scale with the other DMK01 Optimus Prime...yeah, he's smaller.

But with a little paint and glue (it's a non-transformable figure, which some 'fans' has a very long and really stupid discussion on...'if it's not transformable how can they be called transformers?') the kit is actually worthwhile and worth getting. The price is a bit steep, but I do enjoy the occasional challenge (I love Armored Core kits...and those are challenges)...

It seems Takara Tomy is venturing into the model kit realm and wants to grab a piece of the pie and also appeal to modellers with their Transformers line. But they do need to work on some of the quality especially the plastic and fittings. Regardless of all the problems, it's a good try and I would love to see more Transformer movie kits being done...since, that's the only thing that looks as close to the original look...heh.

Here's the DMK02 Bumblebee.


With weapon, closed fist and battle mask on.


I have the 'Work In Progress' shots and explanations on my Facebook Fanpage. So do drop by here (and don't forget to give a 'Like' ya!):

'DMK02 BUMBLEBEE WORK IN PROGRESS PHOTOS AND DESCRIPTIONS'


Since working on this guy, I've been fired up to work on my own DMK01 Optimus and hopefully can get it done soon.

Till next time!

Monday, December 5, 2011

1/35 M26 Pershing

Updated!

Another military kit. One of my last military builds for 2011 I guess. The kit was finished way back in July and just realised that I haven't posted this guy yet here. LOL.

Okay, what is it? It's an M26 Pershing that I really had fun building. Really. Honest. Why? I dunno, just had some laughs doing it. Maybe when I first painted the figures, they looked like Batman's Joker...whoever said painting miniature figures was easy, I'd like to see them do it.


Basically, the technique applied was the same as one of my previous builds. But I applied more on the silver to create the wear and tear rather the application of light brown and some black. It was a simple build (and I think that was the reason I had fun...mueheheheh).

1/35 M26 Pershing


Yep. Another one. And also the last for 2011. Not the last post, just the last military build. Next year is another story. Can we all say...diorama? Lol.

Monday, November 14, 2011

Hasbro Star Wars Snowspeeder (Finished)

Update!

Alright, I was supposed to do a work in progress posting for this guy...but due to my very busy schedule of late...I'm just closing it up.

The Snowspeeder has already been sent to my client and good friend, Azwanijaya. The look on his face when he received it was priceless. It's those kind of things that make what I do worth it.

Okay, enough of the talk...here's the Snowspeeders...(that's plural my friends...)

Luke's Snowspeeder:


Rebel Alliance Snowspeeder:


The Snowspeeders:


Comparison with a standard out of the box snowspeeder:


Now, don't worry...the many stages in the painting of this fantastic machine is recorded. Yep, each picture of the process was taken and uploaded in RK Design's Facebook page. If you would like to see more on the 'work in progress' go to our page and have look. Here's the link:

Work In Progress Part 2 - Snowspeeder


Don't forget to give a 'Like' to the page ya!

Monday, October 24, 2011

TOYSCAPE 2011

Hey everybody!

Nothing much to post lately due to unforeseen circumstances and problems, but I would like to share with all of you something.

This is an event where I will be this coming weekend. Organised by a club from the Faculty of Art and Design, Universiti Selangor in Shah Alam. If you all are free to drop by and have a look at an extensive array of toys and model kits (mainly Gundams) do come over!


(click on the poster for a bigger better view)

Here are the details of the event:

Saturday 29th October 2011

11.00 am - Launch (tentatively if Dean is available)
12.00 pm - Animation Show.
12.30 pm - Fun Forum.
1.30 pm - Toy Design Talk (Mr. Steven from Toy Minister) - tentative
2.30 pm - Animation show.
3.00 pm - Performance.
4.30 pm - Animation Show.
5.00 pm - Lucky Draw.
6.00 pm - Close.

Sunday 30th October 2011

10.00 am - Open to Public
10.30 am - Gunpla building demo by pro modellers
11.30 am - Performance
12.00 pm - Videogame Competition
1.30 pm - Toy Design Talk (Mr. Steven from Toy Minister) - tentative
2.30 pm - Fun Forum
3.30 pm - Performance
4.30 pm - Prize Giving and Lucky Draw
5.00 pm - Closing.

Sponsors:
Firecracker Studio Sdn Bhd

Exhibitors:
WeMaC (G.I. Joe Fanclub)
SembangToys
RedToys
Macross Fans Malaysia
Malaysian Star Wars Fanclub
Malaysian Interest Lego Fanclub

Spread the word and hopefully you all can join in the fun and make it an eventful event.

Friday, October 7, 2011

Hot Toys Ironman Mark 3: Prototype

Update!

Okay here's something that took me a bit to finish. Took a break from my commissioned works to do something a bit different. Yep. And it's been awhile since I actually took a job which is a figure. And not just any figure, a Hot Toys figure.

Now, most Hot Toys collectors know that the Ironman Mark 3 has some flaws in terms of the abdominal area. The colors seem to slowly fade and leaving it a little pinkish...yep.

So I got in my hands one of the earliest Ironman incarnation from the fabulous 1/6 figure makers, Hot Toys. Seeing a sample project that they did (a limited edition figure) called the secret project, I decided to color this Mark 3 following the scheme.

I opt for a more brighter gray than the Hot Toys version. Here is the fella before:


And here is the after the repaint:


I've uploaded 'work in progress' pictures in the RK Design Studios Facebook page, you can check it out at:

'HT Iroman Mark 3 W.I.P'


When you're there, don't forget to click a 'Like' to be able to see updates and other goodies from RK Design Studios.

Till next time! Cheers!

Thursday, September 29, 2011

Hasbro Star Wars Snowspeeder (WIP) Part 01

WORK IN PROGRESS!

Yep. You all read it right. Starting from now, I'll be putting up some 'Work In Progress' postings to be my tutorials on how to do repaints. Actually this was due to so many people requesting I do some WIP tutorials so that they can learn too. And finally I'm doing it. Yeah. Okay, I was given a project commissioned by a friend of mine awhile back. It's a Star Wars Snowspeeder. One of my favourite ships and I think what better way to start of this series of WIP postings.

Shall we begin now?

Now before anything, make sure you mask the areas that you want not touched by the paints. Masking is one of those tedious tasks that isn't enjoyable, but if done well...will save you a lot of grief later...


Once you're happy with the areas that you wanted to mask, now apply the primer. Make sure that the primer is evenly spread and before painting, always check for dust particles. Wipe the surface of the area clean. After applying primer, spray the base paint. Here I'm using a mixture of my own gray.


Let it dry or cure. At least for a few hours or so, but for better paint application...give it a day! Yes, I'm talking about 24hours! LOL. Leaving it that long you will be sure that the primer and the base coat is fully cured.

After it has cured, comes the pre-shading. Now this technique is more or less on what you feel. Not sure how to explain this, but it's something that you acquire after doing it many times. But what I can tell you, doing pre-shades should be in the nook and crannies. And also you have to take into consideration on how the vehicle moves, how the air or dirt flows on it. Heh, and here you thought that repainting was easy eh?


As you can see, I separated the cannons and engine cover. Apply the same as the main body, inclusive of the pre-shades.


The small guns at the back of the speeder was separated and painted differently. After priming, I applied flat black and later did some drybrushing on it to give it that metal weathered look. What's dry brushing? I'll go to it later in another WIP posting. heh.


That's the end of part 1 for the today's WIP posting. Don't worry, I'll definitely do the next one soon.

Hopefully this could motivate or give you guys some ideas on how to paint your figures or vehicles. Now remember one thing, this is a technique that I'm using and modified it along the way. If you can think of some other simpler way, then just do it. Trial and error is a part of being good at what you do.

Till next WIP! Cheers!

Monday, September 26, 2011

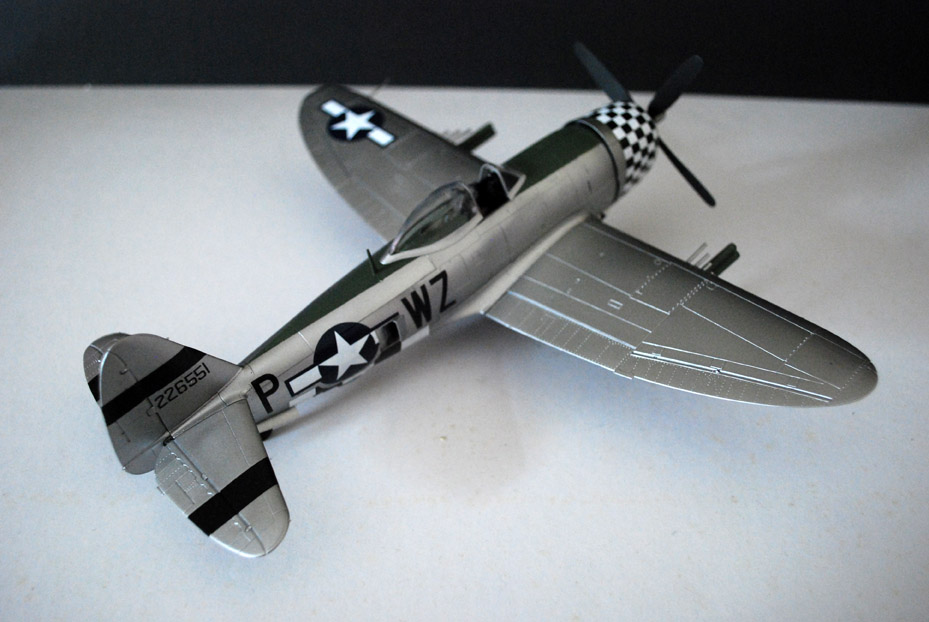
1/48 P47D Thunderbolt 'Bubbletop'

Update!

Yep. A month plus of no updating. Still alive. I think. A lot of work done, but updating has been an issue with me lately. Yeah. I'm just too darn lazy, until I re-read an email I received from a 'friend and fan'...it opened my eyes. If I want people to follow what I do, updating is something that is important.

So here it is.

Okay, this kit has been down way back in July...heh...

Another fantastic kit from Tamiya (and almost got me into airplane kit building), with the small little details...it was awesome.


Now, my client wanted me to follow it close to the original colors and he gave me some suggestions. I chose one and started working on it. The engine cover area is purely decals. Yes. If I did that, that would have been the last work of mine that you'll see...hahahahaha...

So here is the guy...

1/48 P47D Thunderbolt 'Bubbletop'


Okie dokie. That's all for now. I need to dig out more of the work I've done these past few months.

Cheers!

Thursday, July 28, 2011

PLEASE BE AWARE!

Hey all,

A few days ago I was startled to hear of some quite disturbing news. Upon investigation, I think it is safe for me to inform this matter to my readers and also clients.

RK Designs is NOT ASSOCIATED to any local toy shop in doing customisation/repaints.

If there are shops who take in commissioned works and stating it as on my behalf, please contact me at ryukaze@gmail.com.

Up until now, RK Designs does DIRECT DEALINGS with clients who are interested to do customisation/repaints. I have not associated myself with any toy shops or given any kind of agreement that they (the toy shops) I do commissioned works under their name.

Furthermore, if you come across any customs for sale that is said to have been done by me...please search this blog on it's appearance, and if it is not here...send me an email and attach photos for confirmation by me.

Thank you all for taking the time to read this post and I greatly appreciate the support given to RK Designs in all these years.

Here's to hoping to give you all more custom works and products!

Cheers!