Monday, March 5, 2012

Hasbro 6" War Machine Repaint (HT Milk ver. scheme)

Update!!!

Yep...deserves a triple exclamation mark! Why? Cause it has been awhile. Now I know I'm supposed to post my Hasbro Transformers Custom Competition Entry photos, but I haven't gotten to taking proper pics.

But I got something else...this is a project that I've been working on for quite some time. I had with me an extra Hasbro 6" War Machine figure (the movie version) and was thinking of doing a custom. Then I found out that Hot Toys came out with a 'milk version' (I'm not sure why they call it that way...), and I decided to make one for myself. I'm not those who can afford to buy a Hot Toys figure, but I can afford the time to make a 6" version. Heh.

Basically I tried to color it the same as it's Hot Toys counterpart, but I added a little details of my own. What were they?

- Intakes on the left and right of the outer rib area.
- Some panels on the knee.
- Boosters on the back.
- Some simple decals.

Have a look!

War Machine Milk Ver. (6" Hasbro)


Comparison with the original Hasbro War Machine.


Well, That's all for now. I've been hit with the Ironman bug, so expect to see more works on them. Let's just say that...finally, my IRONMEN PROJECT is ON!

Repulsors are go!

Tuesday, January 17, 2012

TF:PRIME Voyager Optimus Prime

HAPPY NEW YEAR!! Yes...I know it's kinda late, but we're still in January right?

Okay...

Update!

Well, this is practically the first thing I finished. Now don't get me wrong, it's not as simple as it looks. You see this figure, didn't have much screw on it. But it had a bunch of bolted in parts. Yes. And then it came down to masking it then. And that was a 'bitch' to do. Yeah, I'm using a profound word to explain how hateful it was to do it. LOL.

Now here is the image before the repaint. My client requested to repaint only the gray ugly parts, not a full repaint.


Simple right. Wrong. It was hours of masking and figuring out how and where the heck should I mask. One of the most tedious things that I hate doing. But the outcome was pretty good. Here it is...(excuse the backgrounds. I was a bit lazy...heheheh)


And that's all for now peeps! One thing that you'd have to look out is the rubber smokestacks and blade. As you can see, there doesn't seem to be any problem...until you bend it.

Till next time~

Friday, December 30, 2011

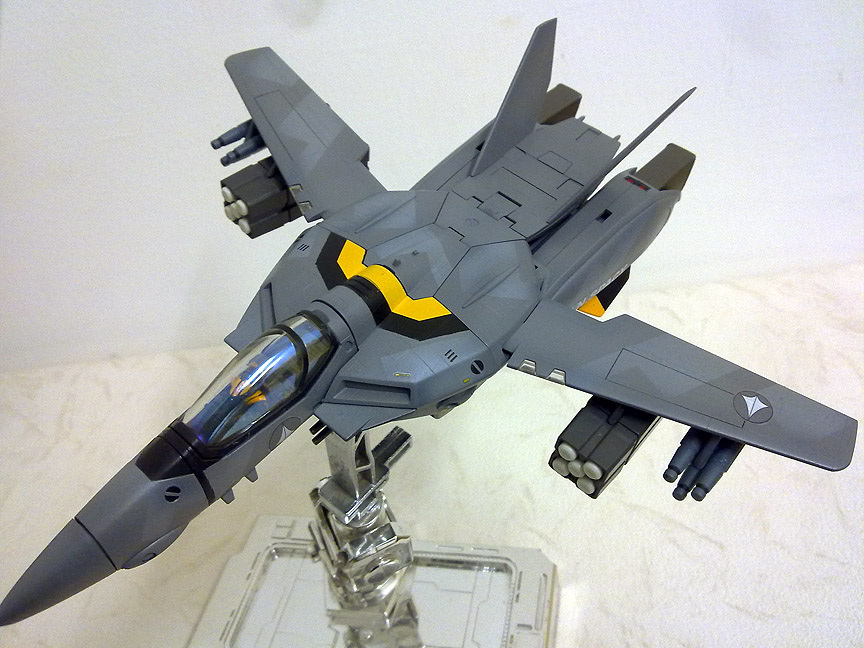
1/60 Low Visibility VF-1S (Stealth Striker)

Update!

As we come to an end for 2011, I'm trying to post up as many works that I've done and haven't posted yet.

So what is it this time? Another Macross fighter. (I reaaaally love the fighters...they are like super smokin' hawt...) Well, actually I have a few valkyrie fighters that I am working on...finishing them requires finesse and I am so happy that my friend W.Hizal has been patient. (Thanks bro!).

Okay, the one I worked on is the Low Visibility version for the VF-1S. The original version didn't really have much 'life' in it and was a bit toyish. So after discussion, my friend seems to be a fan of the Katoki style camo. And that was what I worked with.

Now the undercoat for it was a tad lighter gray then the overall, since I'm doing the camo on it. And I wanted this guy to be more darker since it has been dubbed the Stealth Striker. Once the masking is done, and painted the overall color...I worked on the Strike packs, rather using the original gray plastic...I painted it black. It's stealth...you gotta have black in it right?

What happened was the images that I took got corrupted. But thankfully my friend was pretty good at capturing the pics for the valks...they were even better than mine. So here it is in all it's glory...

1/60 VF-1S Stealth Striker Valkyrie
(photos courtesy of Wan Hizal - owner)


With Strike Packs


Gerwalk Mode


Battroid Mode


(in my overzealous to pass it to Hizal, I forgot to remove some of the masking areas...lol)

Alright, so that's about it friends...I'll see if I can post another of my works before the new year. If not, see you all next year!

HAPPY NEW YEAR FROM RK DESIGN STUDIOS!

PS: Don't forget to give us a 'LIKE' at my...

RK Design Studios Facebook Page

Cheers!

Sunday, December 25, 2011

MG GP03S - RKD Styling

Update!

Alright, looks like I'm back into Gunpla, since my last Gunpla post was way back in March this year...lol.

So who is it to mark me coming back after some time? The GP03. Funny that I've had this kit like 3 times, and all of them I sold before getting a chance to do one for myself. And here, another GP03...but it belongs to my best friend who commissioned me to work on it. He's a pretty busy man, so what are friends for right?

Okay, so I kinda opt for a different approach for this guy. Did some different paint styles to him since I wanted to make it different from the normal out of box design. The inner parts or joints are painted with gunmetal silver of my own mixture. And the white areas are given a slight pre-shade, so it won't have that sparkly white look...and decals, well I had some extra Ka. stickers that was lying around...so why not? Heh.

MG GP03S


Alright...enough for now. Next up will be the MG S-Gundam, but with resin conversions. Muahahahahaha...

Peace out and MERRY CHRISTMAS!