Thursday, April 19, 2012

Classics Hot Rod

Update!

Okay, lately I've been working on some personal projects of mine (actually it's been months...since last year...heh), I call it the revival project. Now what is it you might ask? It's actually custom works on Transformer figures that I think should be pumped up. Don't get me wrong, I think Hasbro has been doing a fantastic job in designing and creating Transformer figures for the fans. You see, I'm a Generation One fan and when Hasbro came out with the Classics/Universe/Reveal The Shield series I was excited!

I was into collecting them until around a year and a half back I stopped. Not sure why, economic problems...scalpers...and a bunch of other things. But a fan will always be a fan since I loved Transformers not for the toys, but the characters...how they lived, their stories, their profiles...who they were! I was more into the comics rather than the shows since the comics (Marvel and IDW) are the perfect medium to tell the tales of the Transformers. That was it. I was hooked again.

But this time...it's different. I intend to remake the Classics/Universe/RTS series into how I wanted to see them. And so...my quest begins.

For starters, I hated that they made Hot Rod (Rodimus) so bleedin' small! As you can see here:


The figure was good. I actually loved it at first, but then realising that he was puny compared to the other bots that was made. (I have a thing for proper scaling)...so sold of mine and made one of my own.

I had an extra Classics Sideswipe body lying around and since it's headless (using it for something else...will be revealed soon!) I took the body. Had the right look to it, and got myself Excillion's head (from the Galaxy Force series)...modded the neck extensions, gave him wings which I added to the engine part for Sideswipe and a paint job...so what do you get?

Classics Hot Rod (RK Designs version)


The Excillion head with new neck joints and the wings which is now part of the engine.


Hot Rod's arm blasters which is also part of his exhaust in vehicle mode.


Size comparison to Universe Kup.


Vehicle mode.


Now, the flames are actually airbrushed on. Did some masking and based the design from his G1 toy version. The only decal part was the Autobot emblem.


And there you have it. My version of Hot Rod. I'm kinda happy with this, but since it's my first design...I found some flaws in it. So if I do get a chance, I might be doing a version 2.0 of this guy...till then...

Hasta la bye bye!

Wednesday, April 18, 2012

Titanium Acidstorm

Update!

This is a snafu for me. I really thought I've uploaded this guy here and found out that I didn't. So first and foremost, apologies to the owner of this fella (which is also a good friend of mine).

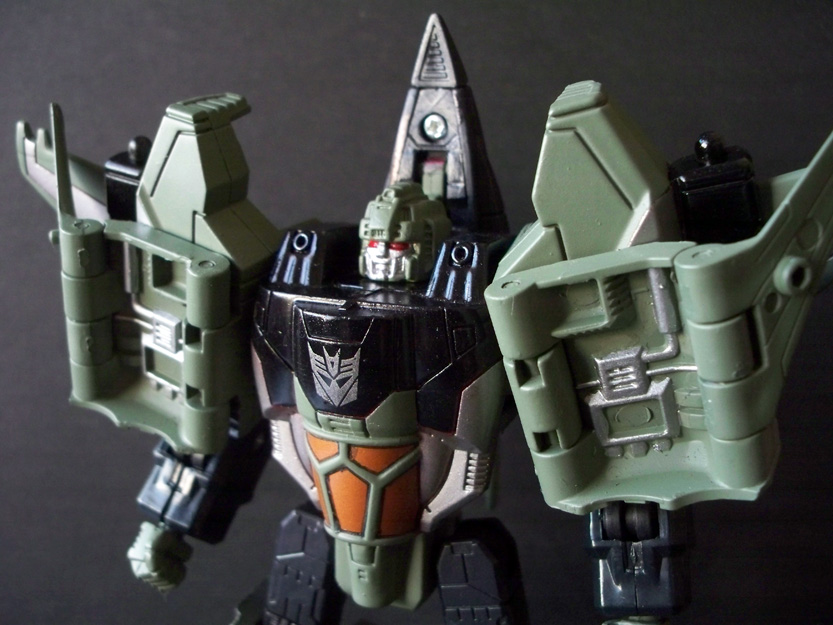
Okay, so what is it actually? This here is a Transformer from the Titanium series. A pretty good line actually with simple transformations and kinda heavy (made out of some kind of metal...not really sure about it). Originally this guy was Thrust (Cybertronian form) as you can see here:


So, my buddy wanted me to repaint this guy into Acidstorm. One of the Rainmakers on Cybertron. He requested that all the black and certain silver parts to remain and the rest is painted to green. Looks like a lot..and I mean a helluva lot of masking! But that's the best part of masking, once done...the results are satisfying (unless you botch it...LOL)...

Here it is, done. (done waaay back in January)...

Titanium Acidstorm


Well, that's all for now folks. Prepping up a bunch of other customs that will be posted soon...here's a sneak peek on what will come in the next few days...heh...


Yep...can you all guess who they are? Pretty obvious right? heheheh...okay, see you all soon!

Tuesday, March 27, 2012

ZeroGunz Forums

Hullo there.

Well, nothing to do with an update actually...just popping in to share something with my followers and readers.

Okay, way back in 2004...I opened up a forum. At the time, I didn't know much about servers and domain names. So I opt for the free forum servers. It was called ZERO-G Forums. With only a handful of members, roughly around 10-20...we slowly grew. In a matter of months, there were many other local gunpla lovers joined in. And the best was when awesome professional modellers joined up!

They inspired the younger members to do gunpla. To improve their skills and share what they knew. It was blossoming. Zero-G had a following. More and more members came in and friendships were created from our small forum.

In 2009, the forum did the biggest change ever. We migrated. From the small free server, we purchased a domain with the help of another forum. From there on it became like a dream come true. Finally we were able to have a proper domain site.

Adjustments were made, bugs were fixed. But along the way, the many years that the forum was around...some members came and went. Old members either stopped coming in or was too busy to do the hobby. It was something that would happen.

Despite all the problems that came and went, Zero-G now known as ZeroGunz has gone through a lot. And the one thing that it had was it's members. Without them, the forum wouldn't have been as it is now. It still held the momentum of being the first local gunpla forum and now having international members, we have gone far.

But after awhile, the forums wasn't as 'busy' as it used to be. New members didn't share much of their works and old members were either retired or have gone to a different group. And finally it dawned upon me that it was time...time to close the forum for good.

While I was backing up the previous entries from members, the forum was attacked by a wave of spam and somehow corrupted most of our data. Only a little data was salvageable. The end was finally clear.

So...with a heavy heart, I closed down the forums. It was a good run. A really good run. But, the passion for gunpla and plakits remained in me. So I decided to open a group in Facebook. It was free and data travelled real time.

So the legacy of Zero-G forums continues in Facebook...Join us there!

ZeroGunz Facebook Group

It was a long time coming, since 2004 till now...2012. 8 years have passed and here's to more years to come.


Monday, March 19, 2012

Hasbro 6" Ironman Mark 6 Stealth

Update!

Some guy sort of said to me that my repaints were not as good since 'people say' that I can't paint 'bling' or do the metallic style painting. What these people didn't know, I just chose NOT to do it. Why settle for what everybody is doing? But apparently, the decision to not play with 'bling' colors got some people trying to 'lowball' me and asking very ridicolously low prices for my repainted works...and that is really...*blip*...ouh...got censored...hahahaha...

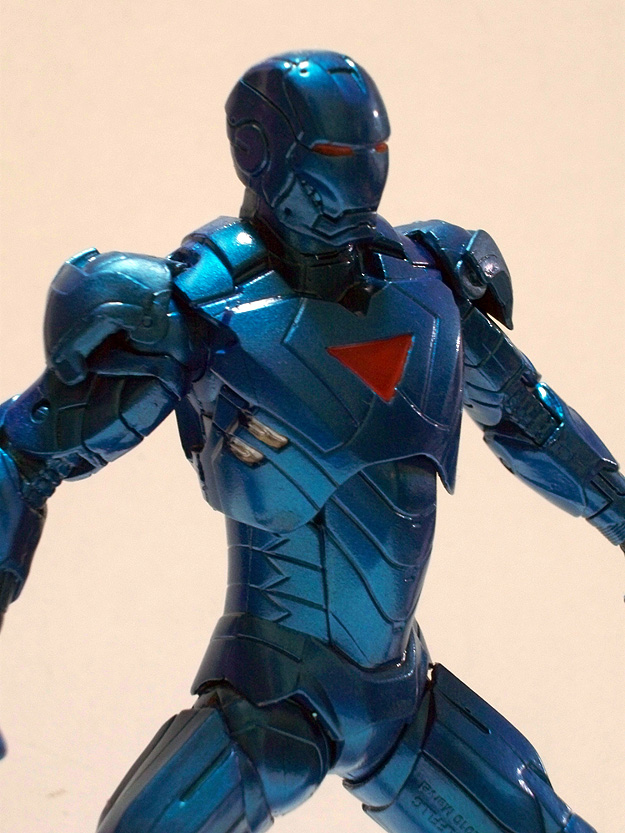
Alright, so in trying to prove to this people...I took a Hasbro 6" Mark 6 figure and decided to make it...'bling. How so? By doing the stealth color version of Tony Stark's Ironman armour. Did some research on the color scheme and finally decided.

So here it is...in all it's 'bling' greatness!

Ironman Mark 6 Stealth Armour


And to further prove that it's 'bling'...snap some pics with flash!


Here's a repulsor blast for ya'...says Ironman to lowballers...heh


Alriteys...more to come in the following week! And don't forget to drop by RK Designs Facebook page to see more updates!

RK DESIGNS STUDIO FACEBOOK PAGE


Cheers everyone!

Monday, March 12, 2012

Hasbro 6" Ironman Mark 4 (beta version)

Update!

Yep, it looks like it's IRON-MADNESS at RK Studios!! Everything has gone IRON-ny...heh...

Alrite, now I had an extra Hasbro 6" Ironman 2 Mark 4 figure. This one is pretty neato since it has Tony Stark's head (in this case Robert Downey's) and is detachable. I was wondering what should I do with this guy and did a survey on what other custom colors or design I can do. Was thinking of going for a seriously heavy mod but then I decided to add a little modding and a nice gray color scheme. Now why gray?

I thought to myself, if Tony Stark developed the Mark 4, there was bound to be a 'beta' version. The trial armour. So that was the reasoning behind this suit's design and colors.

I added some silver to certain parts of the armour to create that prototype look meaning it's a halfway done armour, and slapped on some kotobukiya after market parts just to give some details.

Ironman Mark 4 'beta' (RK Design imaging)


Yeah. Now that's what I call IRON'ing out the design...heheheh. Till next time!

Tuesday, March 6, 2012

Revoltech Ironman Mark 2 Repaint

Update!

Another Ironman project. This time around it's the Revoltech Ironman Mark 2. Yep. The one with blings. Okay, now don't get me wrong...I kinda like the paintjob but it was a bit sticky. Yes. I'm not sure why, and too much 'bling' wasn't really my strong suit...(pun intended...heh).

So, just a few days old...I warmed up the ol' trusty airbrush 'Betsy' (now...I named my compressor based on the hawt X-Man Psylocke...but I could have just called it that right? hmmm...oh well) and primed the sucker! Once primed, I sprayed a nice coat of gloss black and finally applied my mixture of silver. Now the silver that I used isn't the super gloss metallic look...I dimmed it down a bit. Reason? Preference. heh.

Not sure about everybody else, but I kinda like the end product. And another good thing, the dust won't stick on this guy as it would on the original paintjob. Heh.

Revoltech Ironman Mark 2 (RK version)


Yep. There you go. Another Ironman repaint. More to come!!! Wahahahahahaha