Saturday, July 9, 2011

ROTF Leader Class Optimus Prime

Update!

Yes. Another Optimus Prime repaint. But this one uses a technique which was taught by a very good friend of mine. It's a pretty nifty technique, and for me...another notch in my repainting skills. I'm still on the learning process and it gives me great pleasure and fun to be able to do what I do.

Anyhoo, this was one of the Primes that I was given to custom repaint for Big Cinema Sdn. Bhd. Last I heard, this guy has been packed and ready to be shipped to India to be one of their prizes for a contest there. Heh.

Okay...so here he is.

Leader Class Optimus Prime


So here's to hoping that the winner in India would really appreciate what I've done and take very good care of this Prime.

But...maybe I'll be seeing him on ebay pretty soon...LOL.

Cheers!

Monday, June 27, 2011

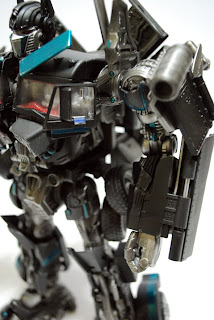
ROTF Nemesis Prime ver. 2

Update!

There you go. Finally!

Okay, so the movie is coming out in the next few days. So yeah, posting movie-verse Transformers repaints is part of celebrating the last movie by Micheal Bay.

I remember doing one of these a while back, but this one was supposed to be done around the same time. I owed this to my sister in-law (yes...she collects primes) way back, but just recently got myself to finishing it...

So, like before I prefer to have Nemesis stylings to be more 'lined' than 'flaming'. Lol. I've always thought that being the reverse version of Optimus Prime should have it all...different.

Enough talk...here it is.

ROTF Nemesis Prime


Here it is. There will be more postings...hopefully by today (if the internet doesn't screw me up...).

Hakuna Matata~!

Sunday, June 26, 2011

RK Designs on Facebook

Hey all...

Sorry that I haven't posted anything yet for this month, but there will be some updates for the next few days. Promise!

Just wanted to give a heads up to RK Designs followers that we now have a Facebook page. Here it is...

RK DESIGNS ON FB! <-- Click here!

So, hope you all will take the time to visit and give us a 'like' to show your support. And we hope that in the years to come, we can one day produce our own products...

Thank you all again for being with us all these years!

Cheers!

Ryukaze

Wednesday, June 1, 2011

How it all started...

Hello all...sorry, but no updates yet...haven't had the time to shoot photos of my current projects...

But I do have a story to share with you all my dear avid followers...heh...

I was talking with my wife last night and she asked me, how did it all started...So I went back to when I was wee little boy, but she stopped me...and asked, "How did RK Designs began dear..."

Oh...

That story...heh...

And I think I haven't shared that little story...so here we are...now get yourself a warm blanket and a nice cup of chocolate drink...and let me tell you a tale of hard painting and tough sandings...

You see, I have been dabbling in Gundams for a very long time...but I actually started kitbashing way back in the 1980's...I was in primary school and my family wasn't that well off. So I had my fair share of toys that I played till it was...erm...unplayable...but I loved my toys no matter what and kept on playing and I modified them. Yep. That was my earliest kitbashing that I can remember...

In the later years, I sort of left what I was doing and started doing other things...scratchbuilding. Yeah, using cardboards and other art materials I was able to make my own Starmax Bomber, Starwolf and a command base. Cool huh? Yeah. I wish I had photos of them cause most of it was destroyed.

Now, fast forward to 2005. I had purchased some knock-off Transformer toys which was an Armada Optimus Prime and Starscream. The reason? I was just curious.

So I thought to myself, what can I do to make this guys better? Not having an airbrush means I'd have to handpaint. And those suckers are quite big and hand brushing wouldn't be smooth. So I went out and bought me a can...wait...make that a few cans of aerosol paints. So being new to this medium, I worked on the Prime. It was quite tedious since I didn't really know what I was doing...

Now they call it...Repainting.

And here's the Armada Optimus that I did in 2005..(it was never finished due to the fact that I started to work on other things...heh)


Ugly huh? With so called panel linings...LOL...

Then I got my airbrush set...and came this...


Masterpiece Starscream to Starscream G1 (TomyTakara) in 2007.

Then...


Masterpiece Starscream to Thundercracker (Hasbro) in 2008

And...


Masterpiece Skywarp to Sunstorm (Hasbro) in 2010...

Must be wondering why I posted images of the Masterpiece Seekers rather than the other works I've done...I guess the MP Starscream was the one repaint that started it all...way back in 2007.

Sigh...now that was a trip down memory lane eh? I guess the upcoming Transformers 3 movie sort of made me go all nostalgic when I started all of this...sometimes, we tend to forget the reason why we do the things we do...not fame, not glamour, not publicity, not acknowledgment and heck not even for money...

but simple honest to God passion.

And I know most customisers has their reasons of doing what they do, but they do it with passion and that is something that should be treasured and not forgotten.

It all started on that one day that I bought the knock-off Optimus Prime and the cans of aerosol paints in 2005.

And the rest is history...

Monday, May 30, 2011

Upcoming Works

Hey all...

Sorry that I haven't posted anything for the past weeks since last month. In truth, there were a lot actually of things that I've done. But for certain reasons, I couldn't post them yet.

But what I can say is, here is a heads up of what to come...

- 1/6 Military Jeep for 12" figures. Yep. This has been going on for some time, but due to paints and time constraints, I had to work on it slowly. (Hold on ya Tom...it's gonna be soon!!)

- Repaints of some Transformer figures: War for Cybertron Optimus, Megatron and Cliffjumper.

- More military kits.

- More diorama displays for Hasbro.

- And last but not least, a kitbash project that I have been working on for a very long time...remember this guy?

The Brain Master <-- Click on this and thy shall know for whom it is...heh

Yep...he's almost done. Why did it take so long? Not enough parts and time. Did a whole reconstruction of him and now he can...*gasp* TRANSFORM!!

So stay tune folks...RK Designs isn't down and out yet...

It's not how we roll...


Monday, April 25, 2011

Trumpeter 1/35 Hind-E

Update!

Another military build, but a different kind of craft. This time around it's a 'choppa' or a helicopter. Yep, aside from the usual Transformers heli...I'm doing an actual model of a heli. And it's scaled at 1/35. Imagine that.


Okay, there were a lot color schemes to choose from and I was thinking of doing one with camo. But then, I just acquired the camo skill so better think of something else. This particular model (or any kind of chopper) if not done right there will be a lot of problems. It's not a tank which I can just re-spray it later. So upon discussion with my client, he gave me the green light to do as I please.

So I opt for the gray colored scheme. First, I think that gray is always awesome on air crafts. Two, it will be able to complement the engine parts that will be having it's hatch opened...

Engine components were done with gunmetal and drybrushed with silver and cockpit area is painted matte black also with silver drybrushing. The whole body was done with some simple pre-shades just to bring out the curves of the chopper.

Here it is...

Trumpeter 1/35 Hind-E
(note that this guy is quite big, and I don't really have a big are for photo taking...heh)


The natural light kinda reminds me of the series Airwolf. Heh.

Till next time!

Friday, April 22, 2011

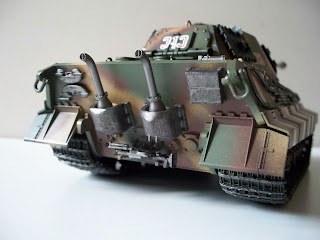
Tamiya 1/35 King Tiger

Update!

Here's another military model that I was working on a while back, finished it prior to my Hasbro work and has been in my hard drive for quite sometime (the pictures that is...hah).


After doing so many spot on colors, I decided this time to try my hand at camouflage...yep. Going into the unknown. That's me alright. So I went around researching on how to do camo. There were so many techniques, but I had to look for something that I can do as a beginner. And something that's around my style of airbrushing.

The first trial that I did, was plasticine. Using it as masking. The outcome? Bad. Really bad. I won't show it here cause I was embarrassed by it. Seriously it was bad. Imagine just this...octopus tentacles going up a tank. Yup. It was horrendous.

After a lot of revising on my technique, I discovered the one that I liked. So the rest was history...here it is:

Tamiya 1/35 King Tiger (Camo version)


I think it was a good try (my client liked it) so I guess now it's just about improving and refining. All I can say it was fun!

Until next time then!

Thursday, April 21, 2011

Thor Movie Display 01 - Official Hasbro Work

Update!

It's been a month since I've posted something new. And with good cause. Lately I've been pretty busy with a bunch of commissioned works that I've been slowly clearing up.

About a month plus or so, I was called by my good friend Alan from Toypicasso if I would be interested to work with him in doing some official commission works from Hasbro. I was speechless at that time and thinking of my luck, I agreed.

With close supervision by Alan, I was given my first job from Hasbro. I told him I've never done dioramas before so he passed me something I could start off with.

The project was to prepare a display case for a 12" Thor movie figure. You see, this figure didn't have any kind of super poseability. Basic articulation and a light up hammer. Here's the figure...


The detailing is pretty good, and the face mold has a very close likeness to Chris Hemsworth.

Okay, since being my first work...I pulled in another pair of hands to help me out. Who else but my wife. She was quite excited about it since she loves to do crafts and stuff. So we set out on our concept. We agreed on doing Asgardian. Alan said it sounded good since we can't do much with the figure.

After cutting, assembling and painting...this is how it looks like.


This emblem was handmade by my wife. It was pretty good since she used mainly household items and some 3D paint.


How the figure stands along with the display.


These are photos taken at Alan's workshop. (Photos courtesy of Alan from Toypicasso)


It was really awesome to be able to work with Alan on this project. He taught me some techniques on painting and how to do toy figure displays. More to come he says, and I can only nod and be ready to do more!

But the best thing, is that I get to do something together with my beloved wife who has been my cheerleader and support in what I do. For once, we can share in doing something...and be proud of it...


(Photo courtesy of Mr. Abdul Hanan Ismail)

This display can be seen at the entry way to the cinemas in Cathay Cinplex (e@Curve or formerly known as Cineleisure), Damansara.

Till next time!